Using this theme
12 min read
This post will walk you through how to install this theme, manage it using the built-in CMS, and configure its plugins.
Table of Contents
Installation
Installing Tufte is as simple as using the Lume init command with the theme
option set to tufte.
deno run -A https://lume.land/init.ts --theme=tufteThe command will create a new Lume site in the current directory, add the Tufte theme, and create a few files to get you started.
Lume CMS
Tufte fully supports Lume CMS, which allows for easy no-code content management.
To use it, start Lume’s local live server using the command below and open http://localhost:3000/admin in your browser.
deno task serveYou should see a page that looks something like this:
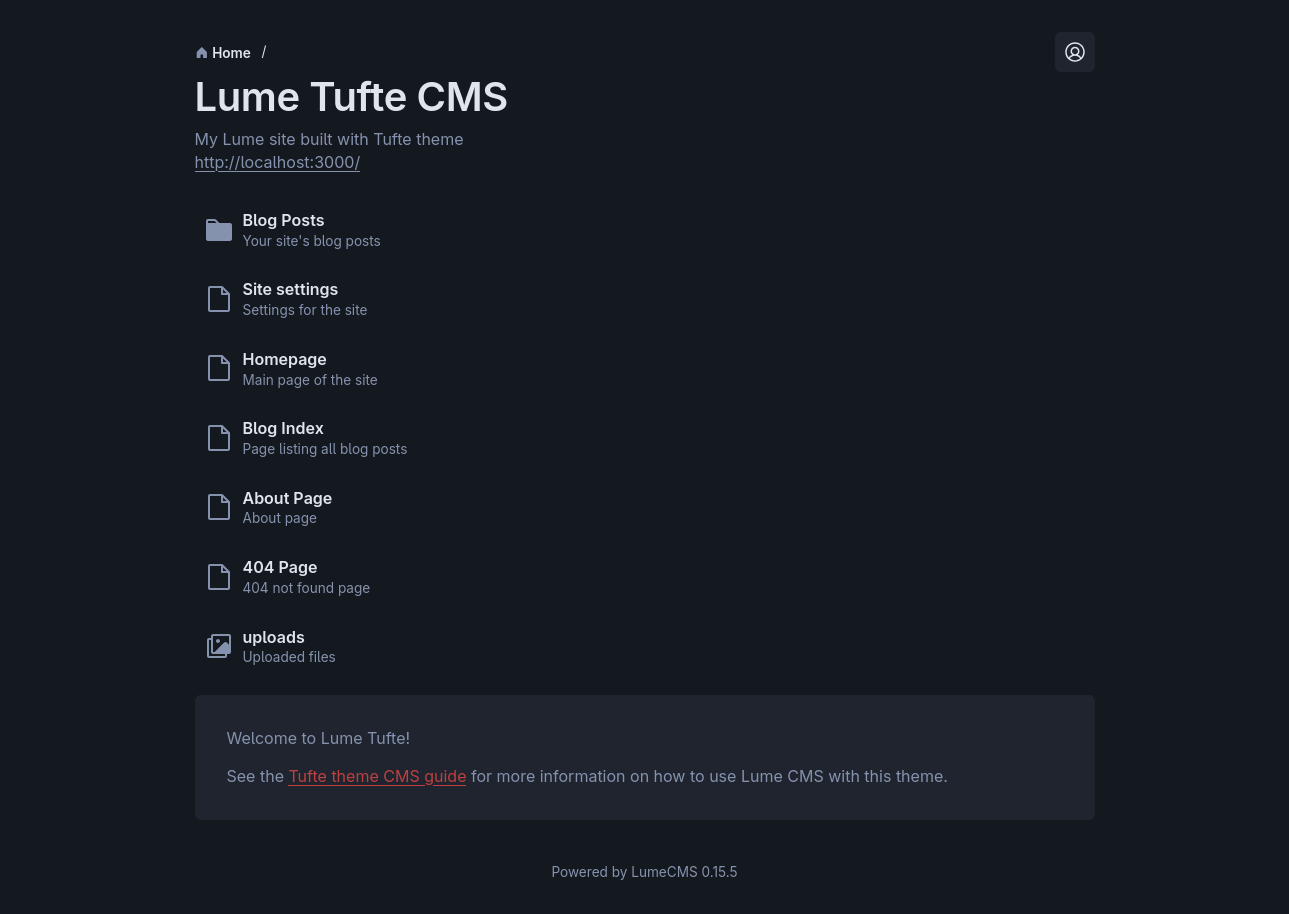
Feel free to explore the CMS. It’s pretty intuitive to use, and I’ve added explanatory comments to almost every setting. If you prefer a more guided approach, read on.
Site settings
The first thing we’ll do after installing Tufte is configure the site settings.
From the CMS home page, click on “Site settings”. You’ll see a lot of settings, but you should only need to change a few of them.
- Locale: Set the Language and Date Locale settings to whatever makes sense
for your site. The defaults are
enanden-GBbecause the starter site is written in English and uses day-month-year date display conventions, but use whichever language you write in and whichever date convention you prefer. Make sure that you use valid BCP 47 values. A few thousand of the most common ones (e.g.en-US) are preloaded and will autocomplete as you type them. - Site Name: You’ll want to change the site name from “Lume site” to something else. If your site is a personal website, maybe set it to your full name.
- Favicon: The default favicon is a capital TT is for Tufte! in the
colors and font that TufteCSS usesWhich I extracted directly from the
font SVG files.,
but you’ll probably want to change it. Click “Browse…”, select your image
in the file explorer, type in a filename for it (e.g.
custom_icon.png), and press enter. Your image will be uploaded and set as the new favicon. It will automatically be optimized and downscaled by the Favicon plugin. - Header: If you dislike the site header I designed, feel free to
completely disable it by unchecking
enabled. If not, you’ll want to customize the header links. By default, one of the links points to the Tufte theme GitHub page, which probably isn’t relevant to your site, so you’ll want to change or remove it. If your site doesn’t use a particular page (e.g. the About page), removing it from the header is a good way to disable it from the CMS. You can also add as many header links as you want, though be forewarned that adding too many will probably cause layout issues.
Blog Posts
Now let’s write the actual content of your site. Open “Blog Posts” from the CMS home.
Initially, you’ll see three blog posts, including this one. You’ll obviously want to delete them, which you can do by opening each one, clicking the button next to “Save changes” that looks like three dots in a vertical line, and clicking “Delete”.
Now you’ll want to create a post of your own. Click “Create new” from the Blog Posts page.
- Filename: Choose a filename for your page. This is where the post will be
physically stored in your project, but more importantly it’ll determine the
final URL. I personally prefer to use short slugs
(e.g.
/usage), but you can hyphenate the title or use some other format if you want (e.g./using-this-theme). Just make sure not to use spaces or other URL-unsafe characters. Also, you’ll need to end the filename with.md, or else Lume won’t process it correctly. The final filename should be something likemypost.md. - Metadata: Set the title, description, author, and publication date of your post. The title can be whatever you want, but it is mandatory. The description, author, and publication date fields are optional though recommended. If you don’t provide the author or date, they just won’t be displayed in the subtitle. If you don’t provide a description, it won’t be put in your site’s meta tag, which can be bad for SEO if that’s something you care about for your site.
- Content: Now for the fun part. Or not, depending on how you feel about writing. You’ll be writing the post content in Markdown. If you’ve used Markdown before, then you know exactly what to expect. If you haven’t, it might take a bit of getting used to, but it’s very easy to learn. Lume uses markdown-it, which is fully CommonMark compliant, but Tufte adds several plugins (some of which are custom) which add a bit of extra syntax for things like math blocks, sidenotes, collapsibles, and more. See the Syntax section for more information.
You might notice that Lume CMS displays a preview of the page you’re editing in the left half of the screen. Depending on how you’re running the CMSIt will work on localhost or on a VPS, but it will not on Deno Deploy or similar., the preview may or may not reflect your changes as you make them, which is not only very cool, but also very helpful for seeing how your text will actually look on your site without having to constantly switch tabs.
Other Pages
Lastly, let’s modify the content of the other pages.
- Home Page: This is the landing page of your site. You can change its
Markdown content to make it say whatever you want. Maybe describe what your
site is about. A few things to note:
- If you use the keyword
/BLOGLIST/anywhere in the content, Tufte will replace it with the blog list component. You can customize the blog list using the Blog List settings.
- If you use the keyword
- About Page: This is a page at the
/aboutURL. You can set its content to whatever you want. The default is an About Me page written from the anthropomorphized theme’s perspective because I thought it was funny, but you’ll obviously want to change it. - Blog Index: This is the page that lists the other blog posts. You can
change its content to describe what you write about.
- The same
/BLOGLIST/keyword as on the home page is available. - Tufte automatically generates an RSS feed at
/feed.rssthat lists all blog posts in a format that RSS readers can parse. You can link to it on any pages that you want (or in the header, or nowhere at all!), but the blog index is a good place to do so.
- The same
- 404 Page: This is the page that displays if the user tries to visit a URL that doesn’t exist. You don’t need to change this unless you really want to, in which case go right ahead.
Remember that if you want to disable either the blog index or the about page, you can just remove them from the header.
Syntax
Tufte expands Lume’s default Markdown syntax in a few ways. It’s all completely optional and normal CommonMark syntax still works perfectly, but the new syntax allows you to write more expressively.
Sidenotes
If you only learn one of Tufte’s syntax features, sidenotes are the one to learn. They’re useful for citing sources, providing extra information, or humorous effect.
They use a similar syntax to GFM’s footnotes, but the sidenote text is inline and you don’t need to specify the number. Here’s an example:
This is my[^"my", in this case, referring to me.] paragraph text.This is my“my”, in this case, referring to me. paragraph text.
Note that on wide screens, sidenotes are displayed to the right of the main text, but on narrow screens (e.g. phones), they are hidden by default and you have to tap the sidenote marker to make them visible.
Margin notes
Margin notes are sidenotes’ weird siblings. They are exactly like sidenotes in every way, except they don’t have numbers. I don’t really like them, but Edward Tufte does and maybe you do too.
They use the exact same syntax as sidenotes, but you add an asterisk after the caret. For example:
I am the very model of a modern major general.[^*No idea why I picked this as the example.]I am the very model of a modern major general.No idea why I picked this as the example.
Subtitles
TufteCSS has a rule for the .subtitle
classhttps://github.com/edwardtufte/tufte-css/blob/gh-pages/tufte.css#L103-L110
that make the text italic and have a large font size. Here it is:
p.subtitle {
  font-style: italic;
  margin-top: 1rem;
  margin-bottom: 1rem;
  font-size: 1.8rem;
  display: block;
  line-height: 1;
}
You can add the subtitle class to a paragraph directly in Markdown using markdown-it-attrs. For example:
Written by A Bunch of Bees {.subtitle}Written by A Bunch of Bees
Math
Tufte comes with Lume’s KaTeX plugin, which allows you to render math in TeX syntax. I recommend reading KaTeX’s supported functions page to learn the syntax if you don’t already know it.
The plugin hijacks the math code language, so all you have to do is use the
triple-backtick syntax and put TeX math inside. For example:
```math
x = \frac{-b \pm \sqrt{b^2 - 4ac}}{2a}
```Figcaptions
To add <figcaption> tags to an image, Tufte includes
markdown-it-smart-mediaWhich,
by the way,
was made by me!. It
expands Markdown image syntax to do all sorts of things, such as automatically
creating <audio> and <video> tags and automatically embedding YouTube
iframes. But it also adds support for the little-known
image title syntax
to output to <figcaption> tags.
You just need to add your caption in quotes after the source. For example:

Fullwidth
On wide screens, the main content only occupies 55% of the screen width, which leaves room for sidenotes and prevents eye strain from reading super-wide blocks of text.
If you need extra space, add the .fullwidth class using the markdown-it-attrs
syntax. For example:
 {.fullwidth}
Epigraphs
Tufte CSS has a bunch of styles for the .epigraph
classhttps://github.com/edwardtufte/tufte-css/blob/gh-pages/tufte.css#L144-L166
that adds specific margins and italicizations. It requires a very specific
structure involving <div> and <footer> tags that can’t be easily created in
Markdown without a complex custom markdown-it plugin that I don’t really want to
makeIf you, dear reader, feel up to the task, feel absolutely free to open a
PR!. So instead I just modified the CSS to work with a standard <blockquote>
structure and some custom classes. It’s not quite the same and the margins are a
bit off, but it’s close enough and I don’t know who uses epigraphs anyways.
To use epigraphs, add the .epigraph class to a blockquote using the
markdown-it-attrs syntax, then add the .quotecite class to the very next bit
of text. You can also add an emdash to the quotecite if you want.
Here’s an example using my favorite quote from Charles Babbage:A close contender is when Babbage compared Benjamin Disraeli (who would later become the Prime Minister) to Herostratus (the ancient Greek arsonist who burned down one of the Seven Wonders of the Ancient World) because he refused to approve more funding for Babbage’s experiments. Yes, really.
> On two occasions I have been asked by members of Parliament, 'Pray, Mr.
> Babbage, if you put into the machine wrong figures, will the right answers
> come out?' I am not able rightly to apprehend the kind of confusion of ideas
> that could provoke such a question. {.epigraph}

— Charles Babbage (inventor of the automatic calculator), 1864 {.quotecite}
On two occasions I have been asked by members of Parliament, ‘Pray, Mr. Babbage, if you put into the machine wrong figures, will the right answers come out?’ I am not able rightly to apprehend the kind of confusion of ideas that could provoke such a question.
— Charles Babbage (inventor of the automatic calculator), 1864
Code
Tufte highlights code blocks using NueglowBy the way, the Lume Nueglow plugin that Tufte uses was made by me!. Nueglow has its own special syntax for highlighting specific sequences and lines.
To highlight a section, surround it with single bullet markers (e.g.
•important•). To underline a section, surround it with double bullet markers
(e.g. ••mistake••). To highlight an entire line, begin it with a greater than
sign (>). To render a diff, use plus signs (+) and minus signs (-) to
start inserted and deleted lines, respectively.
Here’s an example that uses all four. Because I’m using Nueglow to highlight the
example code block, I can’t use the actual bullet marker character, so I’m going
to use a lozenge (⬥) instead. Just remember that they’re supposed to be bullet
markers (•).
```ts
interface User {
  id: number;
  name: string;
}

function greet(⬥user: User⬥): string {
> return `Hello, ${user.name}!`;
}

-const me: User = { id: 1, name: "Not Ethan" };
+const me: User = { id: 1, name: "Ethan" };
console.log(⬥⬥greet{me}⬥⬥);
```
interface User {
id: number;
name: string;
}
function greet(user: User): string {
return `Hello, ${user.name}!`;
}
const me: User = { id: 1, name: "Not Ethan" };
const me: User = { id: 1, name: "Ethan" };
console.log(greet{me});Note that Nueglow uses heuristics rather than grammars, which means that it isn’t always 100% accurate, but it supports every programming language out of the box, even ones that it’s never seen before or that you just made up.
Collapsibles
Tufte includes the
markdown-it-collapsible
plugin to provide syntax for <details> tags.
It’s very similar to the code block syntax, except you use plus signs instead of backticks. Here’s an example.
+++This is the summary

This is the collapsible content. You can put anything you want in here.

+++
This is the summary
This is the collapsible content. You can put anything you want in here.
Table of Contents
Tufte includes the markdown-it-toc-done-right plugin to automatically generate tables of contents.
You can use insert any of ${toc}, [[toc]], [toc], or [[_toc_]] into your
page content and Tufte will automatically replace it with a table of contents
based on your headings. Here’s an example based on this page’s headings.
[]I personally like to wrap my tables of contents in a collapsible, as in the example below, but you can do whatever you like.
+++ Table of Contents
[]
+++Configuring Plugins
Configuring Tufte’s included plugins is not possible from the CMS. You’ll have
to modify your _config.ts file to pass options to the plugins.
For example, to change the theme of the code highlighter, you can add the following lines:
import lume from "lume/mod.ts";
import theme from "theme/mod.ts";
import { type Options as ThemeOptions } from "theme/mod.ts";

const site = lume();

const themeOpt: ThemeOptions = {
   nueglow: {
     theme: "catppuccin",
   },
};

site.use(theme());
site.use(theme(themeOpt));

export default site;
For a complete list of plugin options, consult the documentation for each of the included plugins:
Deployment
Once you’re ready to publish your site, you can deploy it just like any other Lume site. The official Lume deployment guide is a fantastic resource that provides explanations for 13 different hosting services.
Personally, I suggest using the native static hosting service of your Git
provider (e.g. GitHub Pages if you’re using GitHub). If you’re not using Git for
whatever reason, I’d suggest using Netlify Drop.
You just build your site on your computer, drag-and-drop the output _site/
folder onto the Netlify Drop website, and it’ll upload it and host it on the web
for you.
Conclusion
I hope this post was helpful! If you have any other questions, feel free to open an issue and I’ll get back to you.
I hope you enjoy using the Tufte theme!
~Ethan